If you’ve ever twisted the throttle on a Yamaha YZF-R1, you know that the 998cc crossplane engine makes a statement. But with that raw 200-horsepower output comes a sophisticated electronic “brain” designed to keep you from high-siding into orbit.
I’ve seen too many riders hit the track with a “set it and forget it” attitude toward their Traction Control System (TCS). That’s a huge mistake.
Whether you just bought a used R1 or you’re trying to shave seconds off your lap time at Silverstone or Mugello, you need to know exactly how your rider aids are going to react.
Why You Need To Track Test TCS?
The R1’s traction control isn’t just on or off. Depending on model year, you’ve got 9 or 10 levels of intervention tied into wheel-speed sensors, throttle position, RPM, and the IMU
A healthy system should feel progressive and predictable. A faulty one feels binary or worse, or even invisible.
Track testing lets you confirm:
- Intervention timing (milliseconds matter)
- Smoothness of power reduction
- Accuracy of wheel-speed sensing
- Whether the intervention matches the selected TCS level
And yes, this is exactly how Yamaha motorcycle dealers validate these systems at tracks like Silverstone and Mugello.
Pre-Ride Setup: Do This Before You Roll Out
Before you even think about opening the throttle, get the electronics sorted.
Access the YRC Menu
Using the TCS + Reset buttons (or handlebar scroll on newer models):
- Set Power Mode 1 (full power)
- Turn EBM OFF initially to isolate TCS behavior
- Cycle through all TCS levels (1–10 or 1–9)
Here, you’re checking two things:
- Dash numbers change correctly
- The TCS indicator light flashes during the self-check
If the light doesn’t cycle, stop right there. You’ve already learned something.
Tire Prep Matters More Than You Think
Start your first session on cold tires. This exaggerates the slip and makes the TCS intervention obvious. Later sessions should be on properly warmed rubber.
Typical pressures:
- Front: 32 psi
- Rear: 30 psi
Track-specific pressures are fine, just stay consistent. A mismatched rolling diameter can confuse the system.
The Track Test Protocol (Lap-by-Lap)
This is where the magic happens. You’re not chasing lap times. You’re provoking controlled rear-wheel slip and listening to what the bike tells you.
Laps 1–2: Maximum Intervention (TCS 9–10)
This is Rain Mode behavior. Here,
- Pick a slow corner or hairpin
- Exit in 2nd gear
- Roll into wide-open throttle
What you should feel:
- TCS light flickers briefly
- Power cuts progressively, not abruptly
- Rear stays planted and no slide beyond ~5 degrees
A healthy system feels like the bike squats, hesitates for a heartbeat, then drives forward cleanly. No chirping. No snap. If it feels harsh or “dead,” that’s a red flag.
Laps 3–4: Mid-Range Control (TCS 4–6)
This is the sweet spot most riders use for fast street or track days. Here,
- Medium-speed corner
- 3rd gear, about ¾ throttle
- Release the trail braking slightly earlier to induce slip
Expected behavior:
- Roughly 10–15% rear-wheel slip
- TCS light stays on longer, not just flashing
- Power tapers smoothly instead of cutting hard
At these levels, the R1 will allow a mild, controlled drift before reigning things back in. Levels 6 and above will also limit wheelies, so expect a calmer front end on exit.
Laps 5–6: Minimal Intervention (TCS 1–3)
Now we’re in race-oriented territory.
What you should do:
- Fast corner onto a straight
- 4th gear
- Aggressive throttle application
What you should feel:
- 20–30% slip is allowed
- Rear steps out predictably
- TCS intervenes only at extreme slip angles
At this point, intervention is subtle. Mostly ignition trimming rather than throttle closure. If you’re smooth, you’ll barely notice it. If you’re sloppy, it’ll save you once… and only once.
Lap 7: TCS OFF Verification
This is optional, and only for experienced riders. Repeat the same corner and throttle inputs with TCS disabled.
Result:
- No dash light
- Rear spins freely past 50% slip
- The bike responds purely to your right wrist
This lap exists purely as a comparison tool. If the Yamaha motorcycle felt the same with TCS ON at low levels, something isn’t right.
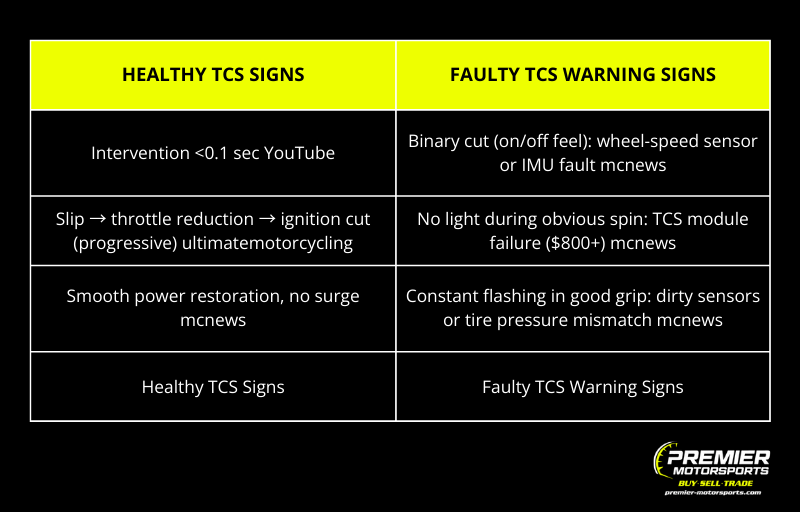
What Healthy vs Faulty TCS Feels Like
Post-Session Data Checks
If your R1 has lap timer telemetry, review RPM drops versus lean angle, intervention should correlate logically.
For deeper diagnostics:
- Enter DIAG mode
- Verify TPS and wheel-speed sensors are within ±1% sync at standstill
Final Thoughts
Testing traction control is about understanding what your bike is doing before you need it to save you. Whether you’re dialing in settings, troubleshooting a problem, or evaluating a used Yamaha R1 motorcycle, this progressive approach gives you real confidence in the system.
When TCS is working right, it feels like the bike is on your side. Ride smart, test methodically, and let the data (and your seat) tell the story.